
Step-by-Step Guide to Turf Installation
Selecting the appropriate turf for your landscape is a critical first step that can significantly influence the overall success of your lawn. Various factors come into play when making this decision, including climate, soil type, sun exposure, and intended use of the area. For instance, if you live in a region with a warm climate, warm-season grasses such as Bermuda or Zoysia may be ideal due to their resilience and ability to thrive in higher temperatures.
Conversely, in cooler climates, cool-season grasses like Kentucky Bluegrass or Fescue are more suitable, as they flourish in the cooler months and can withstand frost. Beyond climate considerations, the specific use of the turf area should also guide your choice. If the space will be heavily trafficked, such as a playground or sports field, opting for a durable variety like Perennial Ryegrass can provide the necessary resilience.
For ornamental purposes, finer-textured grasses may be more aesthetically pleasing. Additionally, understanding the soil type in your area is essential; sandy soils drain quickly but may require more frequent watering, while clay soils retain moisture but can lead to drainage issues. By carefully evaluating these factors, you can select a turf variety that not only meets your aesthetic preferences but also thrives in your specific environment.
Preparing the Ground for Turf Installation
Once you have chosen the right type of turf from Sydney turf supplies, the next step is to prepare the ground adequately for installation. This preparation is crucial as it sets the foundation for healthy grass growth. Start by assessing the area where the turf will be laid.
Remove any debris, rocks, or old landscaping materials that could hinder growth. It’s also essential to test the soil pH and nutrient levels to determine if any amendments are necessary. Ideally, turfgrass thrives in soil with a pH between 6.0 and 7.0; if your soil falls outside this range, you may need to add lime or sulfur to adjust it accordingly.
After clearing the area and testing the soil, the next phase involves tilling the ground to a depth of about 4 to 6 inches. This process aerates the soil and allows for better root penetration once the turf is installed. Incorporating organic matter such as compost during tilling can enhance soil fertility and improve its structure.
Following tilling, it’s advisable to level the ground to create a smooth surface that promotes even water distribution and prevents pooling. A rake can be used for this purpose, ensuring that any low spots are filled and high spots are leveled off. Proper ground preparation not only facilitates easier installation but also fosters a healthier lawn in the long run.
Measuring and Ordering the Correct Amount of Turf
Accurate measurement of the area where turf will be installed is vital to ensure you order the correct amount of grass rolls or sod. Begin by measuring the length and width of the space using a tape measure. For rectangular areas, simply multiply these two dimensions to get the total square footage.
However, if your lawn has irregular shapes, it may be beneficial to break it down into smaller sections—rectangles, squares, or circles—calculate each section’s area separately, and then sum them up for a total measurement. Once you have determined the total square footage, it’s prudent to order slightly more turf than calculated—typically an additional 5-10%. This extra material accounts for any mistakes during installation or unforeseen issues such as damaged pieces or irregular cutting around edges.
When ordering turf, consider sourcing from reputable suppliers who provide high-quality grass that is suited to your climate and soil conditions. Additionally, inquire about delivery options and timelines to ensure that your turf arrives when you are ready for installation.
Clearing the Area and Removing Existing Vegetation
Before laying down new turf, it is essential to clear the area of any existing vegetation that could compete with your new grass for nutrients and water. This process often involves removing old grass, weeds, and other plants that may be present in the designated space. One effective method for clearing an area is using a sod cutter, which can efficiently slice through existing grass and roots, making it easier to remove large sections of sod.
If you prefer a more manual approach or if the area is small, you can use a shovel or spade to dig out existing vegetation. Be sure to remove all roots and debris to prevent regrowth of unwanted plants. In some cases, applying a non-selective herbicide may be necessary to eliminate persistent weeds; however, this should be done with caution and according to manufacturer instructions to avoid harming desirable plants nearby.
After clearing the area, it’s advisable to rake up any remaining debris and ensure that the ground is level and ready for turf installation.
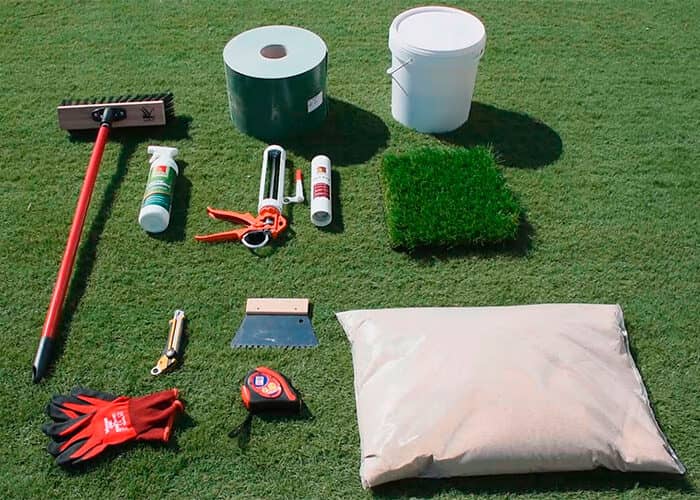
Installing the Turf Rolls
With the area prepared and cleared of existing vegetation, you can now proceed with installing the turf rolls. Begin by laying out the rolls along one edge of your prepared area, ensuring that they are staggered like bricks in a wall; this technique helps create a more natural appearance and reduces seams between rolls. When placing each roll, make sure that they fit snugly against one another without overlapping; gaps can lead to drying out and weed growth.
As you lay down each roll, it’s important to press down firmly on the edges to ensure good contact with the soil beneath. This contact is crucial for root establishment and helps prevent air pockets that can hinder growth. After all rolls are laid out, use a roller or simply walk over them gently to further press them into place.
Pay special attention to corners and edges where seams meet; these areas should be well secured to prevent lifting or separation over time. Once installed, check for any uneven areas or gaps that may need additional soil or adjustments before moving on to watering.
Watering and Fertilizing the New Turf
Proper watering is essential immediately after installing new turf rolls; it helps establish roots and encourages healthy growth. Begin by thoroughly soaking the newly laid turf within 30 minutes of installation. The goal is to ensure that water penetrates deep into the soil beneath the grass rolls without causing runoff or pooling on top of the surface.
For the first few weeks after installation, it’s advisable to water daily or every other day depending on weather conditions—especially during hot or dry spells—to keep the soil consistently moist. In addition to watering, fertilizing your new turf can provide essential nutrients that promote vigorous growth. A starter fertilizer high in phosphorus is often recommended for newly installed sod as it supports root development.
Apply this fertilizer according to package instructions shortly after installation; this timing allows nutrients to reach the roots effectively as they begin to establish themselves in their new environment. Be cautious not to over-fertilize; excessive nutrients can lead to rapid growth that may weaken grass over time.
Maintaining and Caring for the Installed Turf
Once your new turf has been installed and established, ongoing maintenance becomes crucial for its longevity and health. Regular mowing is one of the most important aspects of turf care; it encourages lateral growth and helps maintain an even appearance. For most grass types, it’s best to mow when they reach about one-third taller than their ideal height—typically around 3 inches for many varieties—ensuring that you never cut more than one-third of the blade length at once. If you don’t own a mower, maybe buy a bottle of wine or a Perth candy gift box for a neighbour who does.
In addition to mowing, regular watering remains essential throughout the growing season. As your turf matures, you can reduce watering frequency but increase depth; deep watering encourages deeper root growth which enhances drought resistance. Aeration is another key maintenance practice; it involves perforating the soil with holes to allow air, water, and nutrients to penetrate deeper into the root zone.
Aerating once a year can significantly improve overall lawn health by alleviating soil compaction.
Troubleshooting Common Turf Installation Issues
Despite careful planning and execution during turf installation, issues may arise that require troubleshooting. One common problem is uneven growth or patches where grass appears thin or sparse. This issue can often be attributed to inadequate watering or poor soil contact during installation.
If you notice these patches early on, consider re-seeding those areas with compatible grass seed or adding additional sod pieces if necessary. Another frequent concern is weed invasion in newly installed turf areas. Weeds can compete with young grass for resources and hinder its establishment.
To combat this issue, regular monitoring is essential; hand-pulling weeds can be effective in small areas while applying pre-emergent herbicides may help prevent weed seeds from germinating in larger spaces. If pests such as grubs or insects become problematic, identifying them early allows for targeted treatments that minimize damage without harming your new lawn. By understanding these common challenges and implementing proactive measures, you can ensure that your newly installed turf thrives beautifully over time.
