
Can you install your own windows?
Installing your own windows is a feasible DIY project that can save on labor costs, though it requires careful preparation, the right tools, and some technical know-how to ensure proper fitting and sealing.
FENSA Legal Requirements
FENSA (Fenestration Self-Assessment Scheme) was established in April 2002 by the Glass and Glazing Federation at the request of the UK government to monitor building regulation compliance for replacement windows and doors. This government-authorized scheme ensures that window installations meet strict standards for safety, energy efficiency, and quality.
While there’s a common misconception that FENSA registration is mandatory for window fitters, the reality is more nuanced. Legally speaking, there is no requirement for property owners to use FENSA-approved installers specifically. However, all replacement windows and doors installed after April 1, 2002, must comply with building regulations, which is where FENSA certification becomes valuable.
When selling a property, any windows replaced after April 2002 must have either:
- A FENSA certificate confirming compliance with building regulations
- A Building Regulation Compliance Certificate from the local authority
Without proper certification, homeowners face significant consequences:
- Potential buyers’ surveyors will request evidence of compliance
- You may need to pay for a retrospective inspection (costing £180-260)
- If installations don’t meet regulations, you’ll need to pay for corrections before selling
- In serious cases, enforcement notices or even prosecution may follow
For windows installed by non-FENSA registered companies or as DIY projects, you must obtain approval directly from your local Building Control Department. This involves an inspection to verify proper installation, window specifications, and compliance with thermal insulation requirements.
The cost difference is substantial—while a FENSA certificate costs just £25 when the installation is done by a registered company, obtaining retrospective certification through the local authority can cost £350 or more. This financial incentive, along with the convenience of self-certification, makes FENSA-registered installers particularly attractive to homeowners.
FENSA certification also provides additional benefits beyond legal compliance. It verifies that the installer’s warranty is insured (for certificates issued after June 6, 2014), offering protection if the installation company later faces financial difficulties. FENSA-registered companies undergo regular assessments and audits to ensure their work consistently meets or exceeds required standards.
For clarity, FENSA certification applies to replacement windows, roof lights, roof doors, and external doors with glazed areas exceeding 50% (or 40% for some types). New-build properties follow different regulations, as FENSA certification specifically addresses replacement installations in existing buildings.
Measuring Window Dimensions Accurately
Taking accurate measurements is the critical first step for successful window replacement. The most precise measurements should be taken from the outside of the building, measuring the aperture opening rather than the existing window frame, which might be poorly fitted.
When measuring, always work with the brick-to-brick dimensions, as this represents the true opening where your new window will be installed. You may need to scrape away insulation or rendering to reach the edge of the brickwork for an accurate measurement. For rendered properties, removing some render to view the brickwork edge is recommended, as the thickness of the render might require frame extenders.
For each window, measure the width at three different points:
- Top of the window
- Middle of the window
- Bottom of the window
Similarly, take three measurements for the height at different positions across the window. Record all measurements in millimeters, as this is the standard used by most window manufacturers. From these multiple measurements, use the smallest dimension for both width and height to ensure your new window will fit properly.
For a proper fit, deduct approximately 10mm from your smallest measurements to allow for installation tolerances. This small gap ensures the window can be properly leveled and sealed. When measuring, keep the tape measure straight from point to point to avoid measuring on a diagonal, and ensure it’s held tight for accuracy—having a second person help with larger windows is advisable.
If you cannot access the brickwork opening, you can measure your existing window, but be sure to specify that these are the dimensions you’re providing. For windows with unusual shapes or multiple sections, break the window into individual sections and measure each pane separately, recording width, height, and angles where necessary.
Remember that accurate measurements are crucial—incorrect dimensions can lead to costly mistakes and ill-fitting windows. If you’re uncertain about your measurements, consider consulting a professional installer or builder.
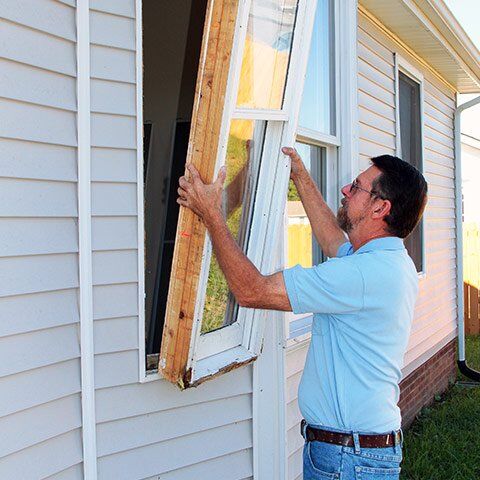
Removing Old Window Frames
Removing an old window frame is a crucial step in the window replacement process that requires careful planning and the right tools. With proper technique, you can successfully remove the existing frame without damaging the surrounding wall structure.
Essential Tools
Before beginning, gather these necessary tools:
- Pry bar or crowbar
- Claw hammer
- Selection of chisels (including bolster chisel)
- Utility knife or box cutter
- Screwdriver
- Hacksaw (for cutting through screws if needed)
- Protective gear (gloves, safety glasses, dust mask)
- Drop cloth or plastic sheeting
Preparation Steps
Start by clearing approximately six feet of space around the window to give yourself adequate working room. Lay plastic sheeting or a drop cloth below the window to catch debris and dust. Cover nearby vents and electrical outlets with tape to prevent dust infiltration.
If the window has opening sashes, remove them first by unscrewing the hinges—this task is easier with an extra pair of hands. Score along areas where paint, caulk, or sealant connects the window to the casing using your utility knife to break the seal.
Removing Window Components
The removal process typically follows this sequence:
- Remove window stops: Use your chisel and hammer to carefully pry off the side stops, followed by the head stop.
- Take out sashes: For double-hung windows, open the lower sash about 4-5 inches, push against both jamb liners at the top, then pull the sash toward you until it rotates 90 degrees in the frame. Lift one side until the tilt pin disengages, then rotate the other side until that pin also disengages. Repeat with the upper sash.
- Remove the jamb liner: Use your pry bar to carefully detach the jamb liner from both sides of the casing. If you plan to reuse the liners, pry every couple of inches along the height; otherwise, pry just a few inches at the bottom and pull out.
- Remove the frame: For wooden frames, make angled cuts through the upright sections with a handsaw. Use a long bar or bolster chisel with a club hammer to pry out the frame pieces. Insert the curved end of the bar into the cut on one side, pull upward to open the joint, and remove the lower piece. Repeat for the upper part and other sides.
For stubborn frames, start at the top middle (as there’s typically a lintel above) and use your pry bar to pull downward, making the frame pull away from the lintel. This will pull the top of each side inward, creating leverage. Work your way down the sides, cutting through any fixings in the blockwork as you go.
If the frame is secured with screws, you may need to cut through them using a small hacksaw. For aluminum windows, carefully inspect for any screws or nails holding the frame in place before attempting removal.
Final Considerations
When removing the old frame, take care to preserve the building wrap or paper intact where possible to maintain the home’s moisture barrier. After removal, inspect the opening for any damage or rot in the sheathing or studs, and address these issues before installing the new window.
For particularly old or difficult frames, cutting the frame into several pieces (typically six cuts: two on each side and two on top) can make removal more manageable and safer.
With the old frame completely removed, you’re now ready to prepare the opening for your new window installation, ensuring you have approximately 5mm of clearance all around for proper fitting.
Standard vs. Custom Sizes
Standard window sizes in the UK vary by window type, with most manufacturers offering both standard and custom options to suit different homes and architectural styles. Understanding the difference between these options is crucial when planning window replacements or installations.
Standard Window Dimensions
In the UK, standard window sizes typically follow common measurements that accommodate most residential properties:
Casement Windows
- Width range: 500mm to 1000mm
- Height range: 500mm to 1450mm
- Popular sizes include 630mm × 890mm and 736mm × 1194mm
Sash Windows
- Width range: 450mm to 1200mm
- Height range: 600mm to 1800mm
uPVC Windows
Common widths include:
- 488mm (19.2 inches)
- 630mm (24.8 inches)
- 915mm (36 inches)
- 1200mm (47.2 inches)
- 1770mm (69.7 inches)
Common heights include:
- 450mm (17.7 inches)
- 600mm (23.6 inches)
- 1050mm (41.3 inches)
- 1200mm (47.2 inches)
- 1350mm (53.1 inches)
- 1500mm (59 inches)
Bay Windows
- Width range: 2400mm to 4800mm
- Height range: 1200mm to 2400mm
Custom Window Options
Custom windows are manufactured to fit exact measurements of specific openings, offering several advantages over standard sizes:
- Perfect Fit: Custom windows eliminate gaps that might require additional sealing or modifications, resulting in better energy efficiency and weather protection.
- Design Flexibility: With custom windows, you can choose unique shapes, colors, and finishes that complement your home’s architectural style. This includes arched, circular, or uniquely angled windows that standard sizes can’t accommodate.
- Quality Control: Custom manufacturing often allows for greater quality control throughout the production process, potentially resulting in higher-quality installations.
- Energy Efficiency: The precise fit of custom windows typically provides better insulation and reduces air leakage, potentially lowering energy bills.
Cost Considerations
The primary drawback of custom windows is cost—they generally come with a higher price tag than standard options. However, this initial investment may be offset by:
- Improved energy efficiency leading to lower utility bills
- Enhanced property value
- Reduced need for modifications to window openings
- Better longevity due to proper fitting
When to Choose Custom vs. Standard
Standard windows are ideal when:
- Your home has conventional window openings
- Budget constraints are a primary concern
- You need quick replacements without waiting for custom manufacturing
Custom windows are preferable when:
- Your home has non-standard or unique openings
- You’re renovating a period property with specific architectural requirements
- Energy efficiency is a top priority
- You want distinctive design features that standard windows can’t provide
For DIY installations, standard windows are generally easier to work with, particularly single-hung varieties which have fewer moving parts and simpler construction. However, even with standard sizes, precise measurements remain crucial for successful installation.
When measuring for either standard or custom windows, remember to take multiple measurements at different points of the opening, as recommended in the previous section on measuring window dimensions accurately.
Handling Damaged Frames
Repairing a damaged window frame is often more economical and environmentally friendly than complete replacement. When confronted with window frame damage, particularly rot, it’s essential to first assess the extent of the problem before deciding on the appropriate repair method.
Assessing the Damage
Before beginning any repair work, thoroughly inspect your window frame to determine the severity of the damage:
- Use an awl or similar pointed tool to probe the wood, particularly around edges and crevices
- Look for soft spots where the tool easily penetrates the surface, indicating rot
- Check for discoloration, cracks, or visible decay in the frame
- Examine whether the damage is superficial or has compromised the structural integrity of the frame
Minor, localized damage is typically repairable, while extensive rot that affects the frame’s structural integrity may require complete replacement.
Repairing Minor Rot Damage
For small areas of rot that haven’t compromised the frame’s structure, follow these steps:
- Remove the rotted wood: Use a chisel and screwdriver to scrape away all decayed wood until you reach healthy, solid wood underneath. Thoroughly clean away all debris.
- Drill small holes: Create small holes in the healthy wood surrounding the damaged area to help the wood hardener penetrate deeper.
- Apply wood hardener: Brush the hardener onto the exposed wood, ensuring it’s thoroughly soaked according to the product instructions. Allow it to dry for a couple of hours before scrubbing with a wire brush.
- Fill the gaps: Use wood filler or epoxy to fill the cavities where you removed the rotted wood. Press the filler firmly into the area using a filling knife. For deeper repairs, apply in layers, allowing each layer to dry before adding the next.
- Sand and shape: Once the filler has completely dried, sand the repaired area to match the contours of the original frame.
- Prime and paint: Apply appropriate primer followed by exterior-grade paint to protect the repaired area from future moisture damage.
Replacing Sections of the Frame
For more significant damage that affects larger portions of the frame:
- Remove the damaged section: Carefully cut out the rotted section of the frame using appropriate tools. Make clean, straight cuts to facilitate fitting the replacement piece.
- Purchase matching wood: Find lumber that matches the dimensions of the removed section. Have it cut to the exact size needed.
- Test the fit: Insert the new piece into the frame to ensure it fits properly. Make any necessary adjustments.
- Secure the new wood: Use screws or nails to fasten the replacement piece securely to the existing frame.
- Seal the joints: Apply caulk to all seams and joints to prevent moisture infiltration.
- Paint and finish: Treat the new wood with preservative, then prime and paint to match the existing frame.
Full Frame Replacement
When damage is extensive or affects critical structural components:
- Remove the entire frame: Follow proper procedures to remove the damaged frame without harming the surrounding wall structure.
- Clean the opening: Remove all debris, old caulk, and adhesive from the window opening.
- Inspect for additional damage: Check the surrounding structure for any water damage or rot that needs addressing before installing a new frame.
- Install the new frame: Follow manufacturer instructions for proper installation, ensuring the frame is level and properly secured.
- Seal and insulate: Apply appropriate insulation around the frame and seal all edges with caulk to create a watertight barrier.
Environmental Benefits of Repair vs. Replacement
Repairing window frames rather than replacing them offers significant environmental advantages:
- Reduces CO2 emissions by up to 90% compared to full replacement
- Conserves resources by extending the life of existing materials
- Minimizes construction waste sent to landfills
- Often provides comparable performance to new installations when properly executed
By carefully assessing damage and choosing the appropriate repair method, you can restore your window frames to proper function while making an environmentally responsible choice. For extensive damage or if you’re uncertain about the repair process, consulting with a professional can help determine the most effective approach.
Conclusion
Installing your own windows can be a rewarding and cost-effective home improvement project if approached with the right knowledge and preparation. From understanding legal requirements like FENSA certification to accurately measuring openings and handling frame removal or repairs, each step plays a crucial role in ensuring a successful outcome. While standard-sized windows offer convenience and affordability, custom options provide superior fit and energy efficiency for unique or older properties. Whether you’re taking on a single replacement or upgrading your entire home, attention to detail and a careful approach can lead to high-quality results that enhance both comfort and property value. When in doubt, don’t hesitate to consult with professionals to ensure your work meets all safety and regulatory standards.